Navigation bar

Showing posts with label Do-It-Yourself. Show all posts

Tuesday, May 11, 2010

DIY: E30 Fuel Filter and Hose Replacement

When Rachel came home from work she told me about how a lady stopped her and wanted to let her know that there was a significant gasoline leak on the underside of her car. She also stated that the gas gauge was reading 1/2 full, when we had just filled it two days ago.

I went outside and had her start up the car. Sure enough, there was a problem with the fuel lines, and it wasn't just a leak: it was a downpour! We decided it would be best if she didn't drive it to work. I instead stayed home from the library and worked to solve the problem. Here is how I solved it.


Tools Needed:
  • Car jack
  • Jack stands
  • 10mm socket and ratchet
  • Phillips screwdriver
  • Flat-head screwdriver
  • Safety goggles
  • Waste bin- to catch spill-off gasoline

Procedure:
  1. I lifted the car with the factory jack and then supported it with jack stands. I would never work on a car without properly supported! I would never rely solely on the factory jack to support the vehicle, especially if I were under it. If I were already planning on replacing the fuel filter I would have removed the fuel filter relay and purged the fuel lines of any residual gasoline. However, I wasn't sure what was the problem.

  2. I had Rachel turn over the ignition to the accessory setting. I was hoping that this would activate the fuel pump and we could see where the fuel was leaking from. We waited and it did nothing. So she turned over the engine. As soon as the car fired up, which took longer than normal, it was evident that the fuel leak was in the same location as the fuel filter. The gasoline was spewing out. Even though we only have the engine on for about 8 seconds, we watched as approximately 1/2 cup of gasoline spilled out and was gathered in our waste container.
  3. Disconnected the negative battery terminal.
  4. Just in front of the fuel tank is a plastic panel. Using a 10mm socket and a Phillips screwdriver remove the plastic panel.

  5. Located underneath the plastic panel is the fuel filter. Often, as in our case, the rubber hoses that connect the various fuel lines become brittle as they age. This was the case with the rubber hose between the fuel sender and the fuel filter.


  6. Unscrew the clamp that is holding the fuel filter in place.
  7. With Vise-Grips, clamp the rubber hoses that are on either side of the fuel filter. They only have to be strong enough to stop the flow of fuel from the tank or from the front of the car. This means that the tension on the clamp should not be enough to pinch the lines. In our case, the main purpose we were doing all this work was because of bad rubber lines.

  8. Loosen the hose clamps on either end of the fuel filter. If you are replacing the rubber hosing (which I would recommend). loosen all the clamps of the hoses you are planning on replacing.
  9. Before you remove anything make sure to take note of the orientation of the fuel filter. You will want to reinstall the filter so that the arrow is pointing towards the engine.

  10. Now remove the hoses and filter and collect the excess gasoline trapped in the filter drain into a waste bin.

  11. Replace all the old rubber hoses with new hose and tighten the clamps. Install the new fuel filter.

  12. Reinstall the plastic covering.
  13. Lower the car, reconnect the battery and reinstall the fuel pump relay (if you removed it). When you attempt to restart the car it may take some time for the engine to eventually turn over. This is because you purged the lines of all fuel. It will take some time for the fuel pump to move the fuel towards the fuel injectors.

It was a pretty simple fix, and in the same time I was able to change the oil, something that was needing to be done anyways.


Monday, May 03, 2010

Custom Rapid-Prototyped Wheel Spacers

After putting on a set of coil-overs my car the stock Style 30 BMW wheels would not clear the coils. When I had the car set at the the desired ride height the coils were about half-way down the strut body. The springs now resided lower than stock and combined with the +38mm offset of the stock wheels the tires rubbed against the springs. To remedy this I removed the helper springs and cranked the spring perches on the front struts until they did not make contact with the tires: I did this so I could get home from the BYU lab we were in.

I hatched a plan to clear the springs until the Style 5 wheels were done being refinished. To accomplish this I would learn a CAD program and have friends in the Engineering Department at BYU develop a spacer for me on the CNC. This was great, but I had a lot to learn. I started by taking multiple measurements from the center hub, mating surfaces, and wheels. I compiled all this information into a model I constructed on VIACad. After I was satisfied I sent the model to be produced on a rapid prototyping machine at school. This is the finished product. They are 10mmm wide, and fit perfectly.

Checklist:
  • Learn VIACad
  • Take Measurements
  • Construct Model
  • Produce Prototype for dry fit
Still to do:
  • Source aluminum for actual spacers
  • Produce spacers and acquire extended wheel bolts


Aren't they pretty?

BMW Style 5 (BBS RC090): Break Down


Tools needed:

  • 3/8" Ratchet/Breaker bar- Do I need to explain this?
  • 10mm 12 point socket- to remove the nuts from the back side of the wheel.
  • 10" socket extension- to be able to reach all the way in to the wheel
  • Nail punch- this is to tap out all the bolts after removing the nuts. I used an old Torx screwdriver that I found lying around the apartment for the last wheel it was tons better because it had a rubber handle and would center itself on the bolt.
  • Old phone book- Place this on the top of the center to protect the finish.
  • A dead blow hammer- I used a regular hammer, because my rubber mallet just wasn't doing the trick.
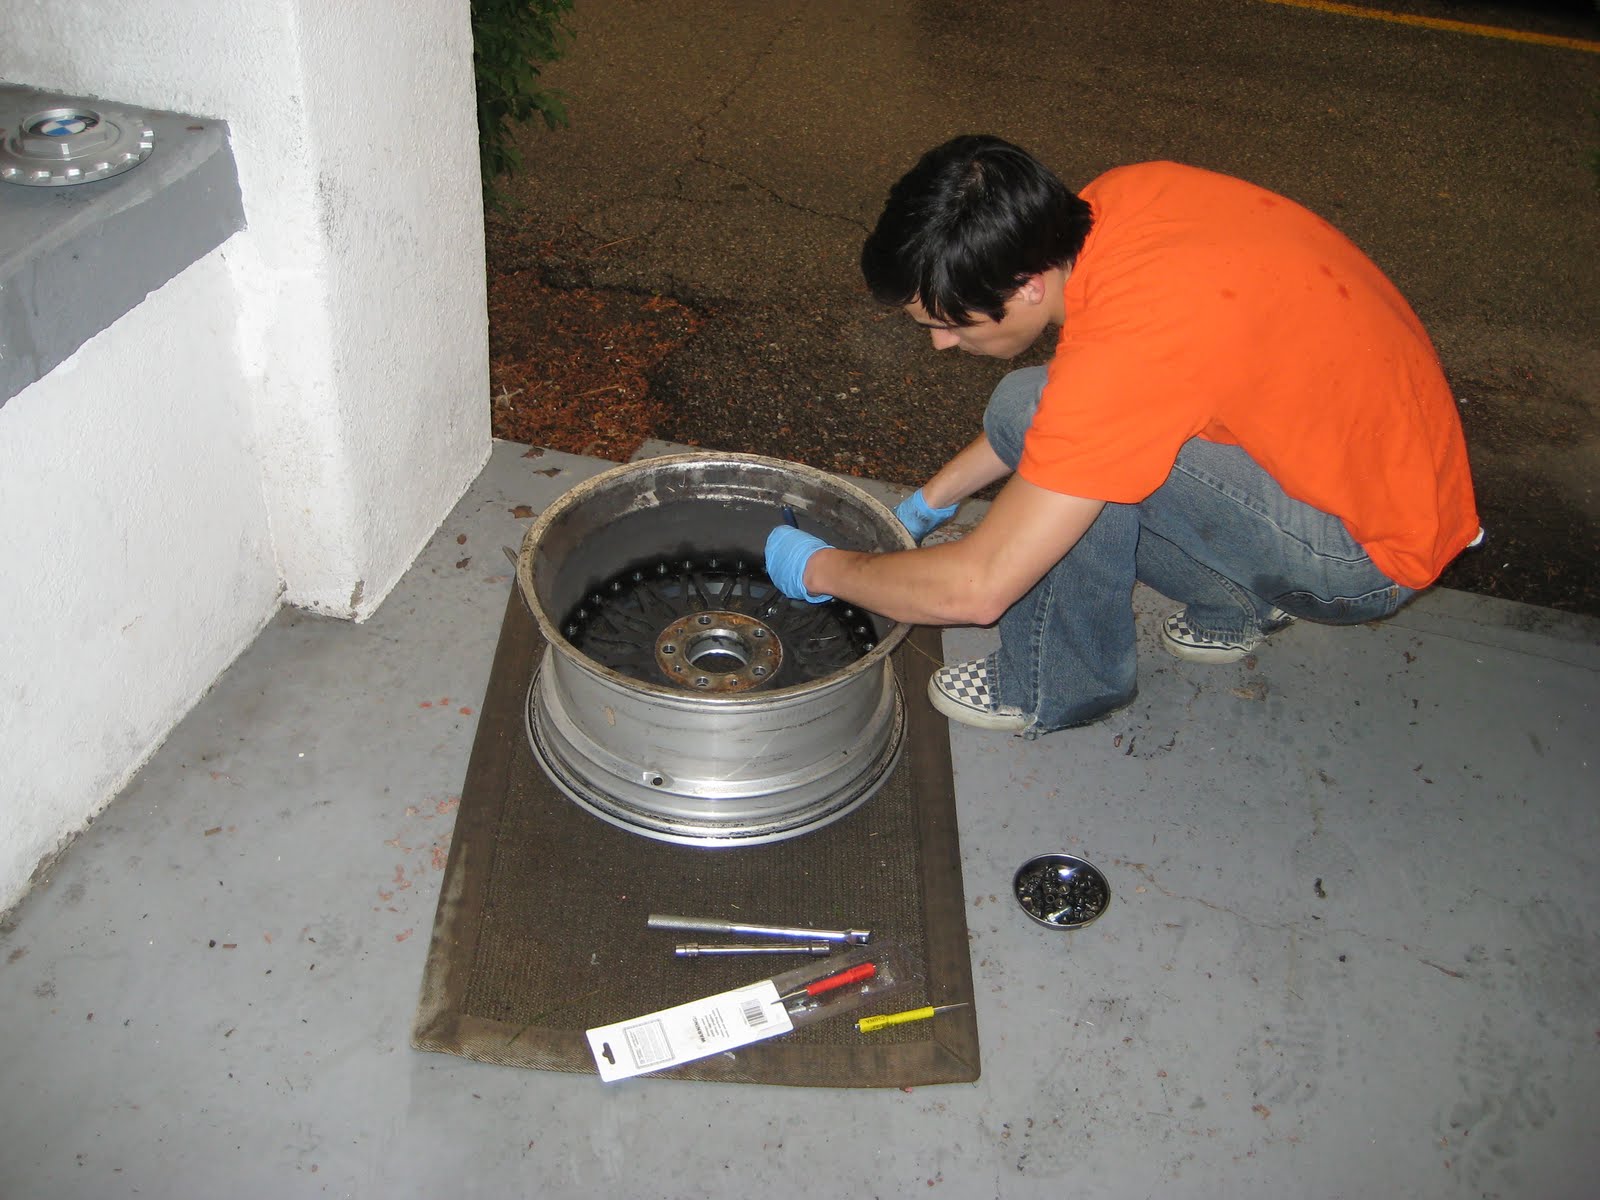
I started out by soaking the inside of the wheel with WD40. I thought this would penetrate between the center and wheel to help me when I wanted to separate the two. Now, after they have soaked a little bit, you can start by removing all the nuts from the back of the wheel. This takes some patience, there are 34 bolts per wheel. I worried that I would break a bolt as some of the nuts were very stubborn and necessitated using the "persuader"--or 26" breaker bar. I collected them in a magnetic dish to keep them all in one place.


Now that you have all the nuts off, you can remove the bolts. You do this by placing a nail punch (blue was the best size for the job), or old Torx screwdriver on the end of the bolt. I thought it was nice that the bolts had an indentation on the center. This kept the punch from moving around or sliding off as I struck it with the hammer. Don't be bashful. These bolts are much like the nuts that you removed, they take a little more effort at times.


This is where the phone book comes in handy. Since Rachel and I look online to find contact information now the phone book has been gathering dust on the refrigerator. Once all the bolts and nuts are removed from the wheel place the wheel on a padded surface, like the rug I was using, facing upwards. Position the phone book on the center of the wheel. Now you can give the center a good smack to separate the two without damaging your centers. I tried and tried with a rubber mallet with no success. I have also read different accounts of people using presses, sledgehammers, and heat guns. All of this sounds a little over-kill, but they weren't the easiest things to remove.


Now get ready to roll up your sleeves. My wheels were caked in over 4mm of brake dust. It was over everything. The centers, nuts, bolts, and the inner portion of the wheels. After a lot of scrubbing I was able to clean them up a bit.


They look pretty good now. But the plans are to polish the lips, replace the bolts and get rid of the curb rash.


DIY: Modena Vader after Leatherique Treatment


I conducted a search to find the best products to recondition leather products. During my search I stumbled across Leatherique products. I was intrigued and decided to give it a try. Here are some pictures to document the restoration.

Before:
As you can see the seats were pretty nasty. Rachel and I decided to drive out to Denver to pick up these seats and upon arrival found them in a filthy garage so we knew we were going to be cleaning them right away. These pictures as of the work done on the passenger side Vader seat.


During:

After:


I thought the seat cleaned up really nicely. It was a relatively easy process, but time-consuming.
It was well worth all the work for the nice clean smell of the leather after the cleaning process was over, as well as getting rid of the sheen across the surface of the leather.

Thursday, April 24, 2008

Mass Exodus and Mirrors

So, my brother and sister left last night for home to make some money before the start of fall term next year. I was pretty bummed because that meant that not only was Kyle moving, but Christopher was too. I would have loved to have gotten all the parts on my car before they left just so we could go on a cruise and take some pictures. Plus, now I don't know who to talk BMW with. My wife is getting really good at just agreeing with my fanatic ramblings.


Before Christopher headed off I wanted to make sure that I got the mirrors. They look amazing! I wish I had done it much earlier. The power works great, and the paint matches beautifully, thanks to Kevin at KC's Bend 'n' Mend. It will take a little while to get used to the littler mirrors, but the convex lens towards the outside of the mirror (a european M3 feature) makes it easier to see objects in a more peripheral position than the US M3 mirror offers.

A lot of work for .75" of drop

Yesterday I helped Kyle lower his car. He chose to put H&R OE Sport Springs on his M3 to bring it modestly lower. In order to do this Kyle also had to purchase '95 M3 strut hats and rent strut spring compressor. With all of my tools, a little elbow grease (provided by Kyle's gym membership), and an occasional reference back to the insufficient Haines manual, we got it all put together. I think it looks great--although Christopher's Estoril is still lower. It was a lot of fun putting the suspension in, especially since it was...
  • the last day of finals,
  • the day my brother and sister were planning to drive home for the summer,
  • no one seemed to have a spring compressor in stock,
  • and a handful of really good friends dropped in to say hi unexpectedly.
I have some pictures here to chronicle the momentous occasion for Kyle. Plus, now he can lower his wife's car.

All-in-all, it took us from 2:45p-5:45p. (That was the time that my last final was, and thus the deadline for working on bimmers.) Things would have gone a little faster if I had remembered how it disassemble the strut like I had done with Chase's '92 318i. At the end the drop was much lower than the original stock springs. He took it on a test ride to make sure that all the parts were going to stay on the car, and to bring me up to my final. Kyle noted that there was a noticable difference in the way that the car rode. I believe him, although it could all be in our heads from working in a wheel well for the last three hours. Regardless we all enjoyed ourselves.


Thursday, March 27, 2008

Tuning on a College Budget


After four years of searching the wait is now over. DDM Tuning has offered an E36 M3 bumper for $112.25. I would definitely recommend checking out their website (click here to learn more). And I, needless to say, am jumping on the bandwagon for this one. Plus, I found out that I can replace my non-M3 front bumper and also get an M3 rear bumper for a better price than just to replace my front bumper with an aftermarket 3-series one. This will transform the exterior of my car from a 3-series to a Boston green M3. While I was at it I am replacing the fog lights and adding Lamin-X to insure that they will be around for longer. My brother is up-dating his headlights on his estoril M3. This means he is adding DEPO brand glass headlights, with 6000K HID's and installing angel eyes. He will also use yellow Lamin-X on the fog lights to turn them into French fogs. I can't wait. The shipping arrival of the bumpers is March 31.

Tuesday, April 24, 2007

Rear Headrest Retro-fit DIY

I have been itching to do something new to my car, but maintain the clean look and German sophistication of my BMW. I wanted to start with something small. As I was surfing the web I came across a post about rear headrests that were standard on many of the later E36 models. This was not an option that was given on my year 325is. I found a smokin' deal on a set of headrests and decided to tackle this project.


1. Fold down (or remove) the folding seats. Remove the side bolster with a strong tug at the top. Carefully remove both C pillar trim covers; remember to disconnect the light wiring.

2. To remove the black trim that lines the top of the trunk opening you need to remove the four black plugs. This was the most time consuming part. i would suggest buying four new ones from BMW. Otherwise, I used a couple forks, quarters-as wedges- and a pair of pliers to remove them without sufficient damage.

3. I removed the two speaker grills, and third-brake light cover to give me more handles when I removed the rear parcel.

4. Carefully slide out the rear parcel, pulling straight out. This is what it looks like upside-down when it is out.


You will see these four of these imprints on the back of the rear parcel.


I used a utility knife to cut out the holes for the trim pieces.


When I got them in I realized how faded and nasty the real parcel was. (this has one side with the post trims and one side without)


5. When you replace the rear parcel back into the car make sure that the four little edges on the rear of the rear parcel slip back into their place. Then, with the speaker grills out place the posts into the their slots and slip the spring washers into place by lifting up the parcel to gain acccess. This is where they go.


6. Slap on the headrests, and halfway there.

7. Return all the parts back in the reverse order.

Rear Headrest Retro-fit (cont.)


Here is the small list of things that are required to make this happen...

These are all things that I have extra. They are available, email jeremykoontz@gmail.com for more information.


4 covers that go around the headrest posts in the rear parcel. (Part numbers; Schwarz, 52 20 8 135 923; Grau, 52 20 8 190 349; Beige, 52 20 8 190 350; Klassischrot, 52 20 8 190 351; Tuerkis, 52 50 8 190 352; Blauviolett, 52 20 8 190 353; Safrangelb, 52 20 8 190 354)

4 spring washers that secure the post below the rear parcel. (Part number 52 10 928 809)


4 rear headrest posts, two left and two right. (Part numbers; left, 52 20 1 977 897; and right, 52 20 1 977 898)


The most important part, two headrests.